
Repairing a Discontinued Polypropylene ATV Snorkel With Plastic Welding
When a customer could not locate a replacement snorkel for his 21-year-old ATV, he brought the damaged polypropylene component to Jaeger Technology Group.
The part had a complex molded shape, extensive oil contamination, cracking, and a large damaged section. Because the ATV needed to be returned to service quickly, the goal was not simply to determine whether the snorkel could be reproduced. We needed to identify the fastest reliable way to restore the original component.
Although 3D scanning and printing were considered, the geometry, internal airflow passage, damaged surfaces, and required turnaround made complete reproduction challenging. Repairing the original polypropylene part was the more practical solution.
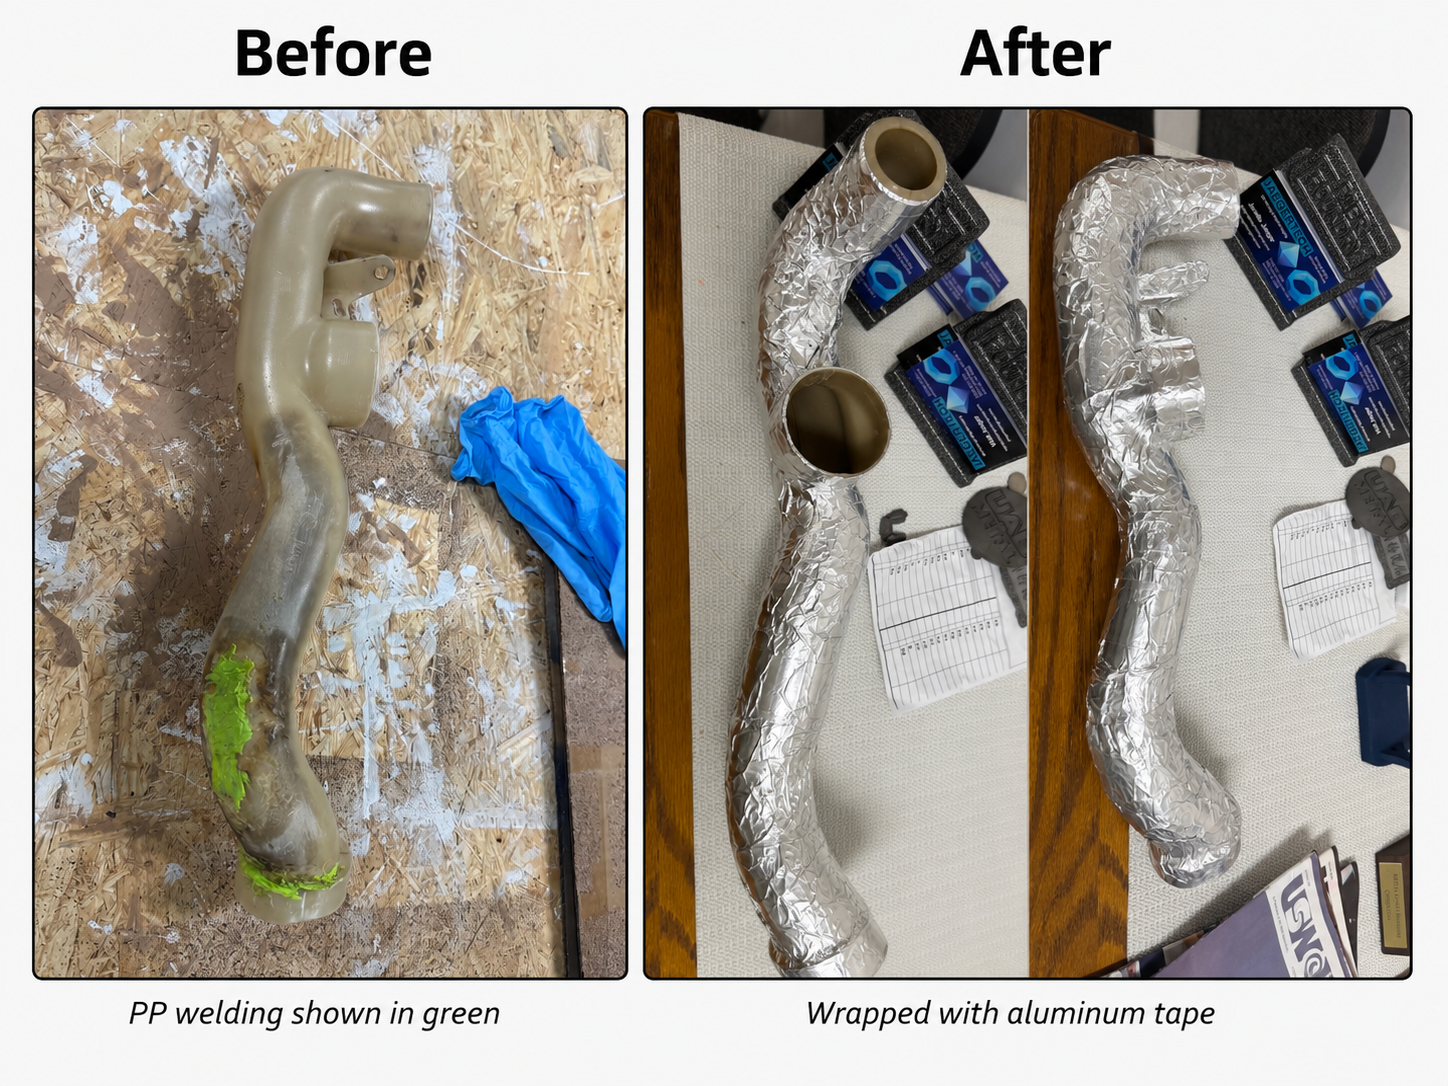
The damaged section was rebuilt using compatible polypropylene, shaped to match the surrounding geometry, and wrapped with aluminum foil tape as a secondary sealing and protective layer.
The finished repair preserved the original mounting geometry and intake path while avoiding the delay and expense of a complete reverse-engineering project.
Why an ATV Snorkel Repair Must Be Functional
An ATV snorkel forms part of the engine’s air-intake system. It routes incoming air toward the airbox while helping protect the intake from water, mud, dust, and debris.
A successful repair must do more than hold two pieces of plastic together. It should:
- Preserve the internal airflow path
- Maintain the original shape and clearances
- Resist vibration
- Remain stable around engine heat
- Minimize potential air leakage
- Withstand exposure to oil, dirt, water, and cleaning chemicals
The repaired component did not need to look like a new injection-molded part, but it did need to remain stable, fit correctly, and function reliably.
Identifying the Original Plastic
Before repairing an automotive plastic component, the material should be identified whenever possible.
Common materials used for intake ducts, airboxes, and under-hood plastic components include:
- Polypropylene
- Polyethylene
- ABS
- Nylon
- Glass-filled nylon
- Talc-filled polypropylene
- Thermoplastic rubber blends
This part appeared to be polypropylene, commonly abbreviated as PP, and may have contained mineral or talc filler.
Material identification was important because plastic welding is most reliable when the repair material is chemically compatible with the original component.
Trying to repair polypropylene with ABS, PLA, PETG, or an unknown filler material may create a patch that appears secure initially but separates when exposed to heat, vibration, or flexing.
For this repair, polypropylene filament was used as the welding material.
Why Adhesives Were Not the Best Primary Solution
Polypropylene has very low surface energy. In practical terms, most conventional adhesives do not grip it particularly well.
Common epoxies, body fillers, fiberglass resins, and general-purpose glues may appear to stick at first, but the bond can fail when the part flexes, heats, vibrates, or becomes contaminated.
Specialized methods can improve adhesion to polypropylene, including:
- Flame treatment
- Plasma treatment
- Corona treatment
- Polyolefin adhesion promoters
- Specialty two-part adhesives
- Mechanical fastening
Those methods can be useful, but they add cost and uncertainty, particularly when the original plastic is old, damaged, and contaminated with oil.
Plastic welding offered the best opportunity to rebuild the missing structure using material compatible with the original snorkel.
Cleaning Oil-Contaminated Polypropylene
One of the most difficult parts of the repair was contamination.
The snorkel had absorbed or retained a surprising amount of oil during its years of service. Even after repeated cleaning, contamination continued to emerge as the part was heated, sanded, and reshaped.
This is common with older automotive plastics.
Years of exposure to oil mist, fuel vapor, dirt, heat, and engine residue can leave contamination embedded in cracks, scratches, damaged surfaces, and the outer layers of the plastic.
The component was cleaned as thoroughly as practical before welding. Loose material and deteriorated surfaces were removed, and the repair area was prepared to expose usable polypropylene.
Even with careful preparation, heating can bring additional contamination back to the surface. Oil interferes with fusion and can contribute to small voids, weak areas, or pinholes.
There is also a point where continued sanding becomes counterproductive. Aggressive reworking of old plastic can expose additional degraded material and enlarge the repair unnecessarily.
The objective was to achieve a sound functional repair without damaging more of the original component.
Why 3D Scanning Was Challenging
At first glance, 3D scanning and printing a new snorkel might seem like the obvious solution. In practice, this component was a difficult candidate for direct reproduction.
Optical 3D scanners require a clear line of sight to the surface being captured. The exterior could potentially be scanned from several angles, but the enclosed airflow passage, deep recesses, narrow openings, and internal transitions would remain partially inaccessible.
The part also included:
- Irregular molded curves
- Hidden internal surfaces
- Transitions between round and formed sections
- Areas altered by damage
- Dark plastic surfaces
- Oil and engine residue
- Thin and varying wall sections
A scanner would record the component as it existed at that moment, including cracks, missing material, deformation, and surface damage. It would not automatically restore the original factory geometry.
The scan could have provided useful exterior reference data, but incomplete internal areas would still have required manual reconstruction in CAD.
Why 3D Printing Was Not the Fastest Solution
Scanning would have been only the first stage of reproducing the snorkel.
A complete reverse-engineering process would likely have required:
- Preparing and scanning the accessible geometry
- Aligning and repairing the scan data
- Reconstructing the hidden internal airflow passage
- Correcting the damaged original geometry
- Establishing usable wall thicknesses and connection features
- Printing and test-fitting a prototype
- Revising and reprinting the design
- Validating the final material and fit
That process is possible, but it is not necessarily the best answer when a customer needs an older machine returned to service quickly.
A replacement snorkel would also be a relatively large, thin-wall, hollow printed part. Print orientation, support removal, warping, layer adhesion, sealing, temperature resistance, and chemical exposure would all need to be considered.
Standard PLA would not be an appropriate material for this application. More suitable options might include polypropylene, nylon, ASA, or another engineering thermoplastic, but each would introduce additional manufacturing and validation requirements.
Polypropylene itself can be difficult to print because it is prone to warping and does not adhere well to many conventional build surfaces.
Because the original snorkel still retained most of its mounting geometry, airflow path, and overall shape, repairing it was considerably faster than developing and validating a new printed component.
Rebuilding the Damaged Section
The failed area was rebuilt using polypropylene filament as welding material.
The repair process included:
- Cleaning and preparing the original plastic
- Removing loose and deteriorated material
- Carefully heating the repair area
- Adding compatible polypropylene
- Fusing the new material into the original component
- Building the damaged section slightly oversized
- Sanding the repair to restore the contour
- Reforming the area to follow the surrounding geometry
The patch was not treated as a cosmetic surface coating. The objective was to rebuild the missing structure and integrate the replacement material into the original snorkel.
The green material visible in the repair photographs shows the polypropylene added during the welding process.
Controlling Heat During Plastic Welding
Heat control is critical when welding polypropylene.
Too little heat can leave the repair material sitting on the surface without meaningful fusion. Too much heat can thin, burn, distort, or further damage the original component.
The goal is to soften both the base material and the added polypropylene enough for the materials to combine without overheating the surrounding area.
Automotive plastics can be difficult because wall thickness often varies throughout the part. Corners, ribs, transitions, damaged areas, and thin sections can all heat at different rates.
The repair was built gradually rather than applying a large amount of material in a single pass.
This reduced the risk of:
- Warping the entire component
- Burning the original plastic
- Trapping large internal voids
- Creating severe residual stress
- Losing the original fit
Sanding and Reforming the Repair
After welding, the polypropylene was sanded and shaped to restore the contour of the snorkel.
The welded area was intentionally left slightly oversized so the final shape could be developed gradually.
This is generally safer than attempting to produce a perfect surface during the welding stage.
The rebuilt area was formed to follow the original geometry and internal airflow path. Once completed, the repair was rigid and did not move under normal hand pressure.
The primary performance requirements were:
- Structural stability
- Correct fit
- Proper clearance
- A usable airflow path
- Minimal leakage
- Resistance to vibration
Cosmetic perfection was secondary to returning the component to service.
Addressing Possible Pinholes
Because of the embedded oil and deteriorated original material, there was some concern that very small pinholes could remain in the repaired area.
Additional sanding and welding might have eliminated every visible imperfection, but it also risked exposing more contaminated plastic and weakening areas that were already stable.
This is an important judgment call in restoration work.
It is possible to spend many additional hours pursuing cosmetic perfection while unintentionally creating new damage in an old component.
Once the polypropylene repair was rigid and functional, the decision was made to stop disturbing the original material and add a secondary sealing layer.
Using Aluminum Foil Tape as a Secondary Seal
High-quality aluminum foil tape was applied over the repaired section.
The foil tape was not the structural repair.
The damaged section had already been rebuilt through polypropylene welding. The aluminum layer was added afterward to provide supplemental sealing and surface protection.
It served as an additional barrier against:
- Minor pinhole leakage
- Moisture
- Dirt
- Abrasion
- Surface contamination
- Further deterioration of the repaired area
The tape was carefully formed around the entire repair rather than applied as a small isolated strip. This created a more continuous outer membrane and reduced the number of exposed edges.
The silver surface visible in the completed photographs is the aluminum foil tape covering the welded polypropylene repair beneath it.
Why Ordinary Duct Tape Would Not Be Suitable
Aluminum foil tape should not be confused with ordinary cloth-backed duct tape.
Standard duct tape is usually a poor choice for an intake or engine-area repair because its adhesive can soften, collect dirt, dry out, and separate under heat or moisture.
A proper foil HVAC or automotive sealing tape provides:
- Better temperature resistance
- Better moisture and vapor resistance
- A thinner profile
- Improved conformity to irregular shapes
- A more durable outer surface
- Greater resistance to drying and cracking
Even high-quality foil tape should be considered a supplemental seal rather than a substitute for structurally repairing the plastic beneath it.
The Completed ATV Snorkel Repair
The finished repair restored the damaged polypropylene structure, preserved the original mounting geometry, and followed the existing shape of the intake passage.
The repair process allowed the customer to avoid:
- Waiting indefinitely for a discontinued replacement
- Purchasing an entire used assembly
- Funding a complete reverse-engineering project
- Delaying the return of the ATV to service
The completed part was functionally sealed for its intended use and protected with an aluminum outer layer.
This was not an attempt to create a brand-new injection-molded component. It was a practical restoration of an original part that was difficult to replace and needed to be returned to service quickly.
Repair Versus Complete Reverse Engineering
3D scanning and additive manufacturing are valuable tools, but they are not automatically the fastest or least expensive solution for every discontinued component.
Complete reverse engineering is often justified when:
- Multiple replacement parts are required
- The original component is beyond repair
- Accurate internal geometry can be measured
- Future production supports the development cost
- Time is available for testing and revision
- A repeatable digital replacement is needed
Direct repair is often more practical when:
- Only one component is required
- The original part still fits correctly
- Damage is limited to one area
- Replacement parts are unavailable
- Quick turnaround is important
- Functional restoration is the primary objective
In this case, repairing the existing snorkel allowed us to preserve the complicated factory geometry while rebuilding only the failed area.
Choosing the Right Manufacturing Solution
Modern manufacturing provides many possible repair and replacement methods, including:
- Plastic welding
- 3D scanning
- CAD reconstruction
- Additive manufacturing
- Composite reinforcement
- Machining
- Mechanical fastening
- Hybrid repair methods
The best solution depends on the material, geometry, quantity, operating environment, budget, and required turnaround.
Sometimes the correct answer is to create a complete digital model and manufacture a new part. In other cases, the most effective approach is to preserve the geometry that remains and rebuild only the damaged section.
For this 21-year-old ATV snorkel, polypropylene welding and a carefully applied aluminum sealing layer provided the fastest practical route back to a functional component.
Plastic Repair and Reverse Engineering in North Alabama
Jaeger Technology Group provides plastic repair, reverse engineering, 3D scanning, 3D printing, prototyping, and component-restoration services in Decatur, Huntsville, and throughout North Alabama.
We work with difficult, discontinued, and unusual components where conventional replacement options may no longer be available.
Depending on the application, the best solution may involve repair, digital reproduction, or a combination of both.
This ATV snorkel project demonstrates the value of choosing the process that best fits the customer’s actual need rather than assuming every obsolete part must be recreated from scratch.
About the Author: jaegertechgroup.com

STAY IN THE LOOP
Subscribe to our free newsletter.
Leave A Comment
Integrating a Tablet, Scanner, and Maintenance Hardware Into One Aerospace Field Tool In aerospace maintenance, the challenge is rarely just collecting information.
From 3D Scan to Perfect Fit: The Corvette Bumper Project Moves Forward A few weeks ago, we shared a project that demonstrated
Great Conversations and New Connections at SMD in Huntsville Last week, Janelle and I had the opportunity to attend SMD in Huntsville,
3D Printed Sand Casting Patterns: Choosing the Right Material for Reusable Tooling By JaegerTech – Practical Guidance for Foundries and Pattern Makers