
Designing a Custom Interactive Kiosk: From Concept to Production
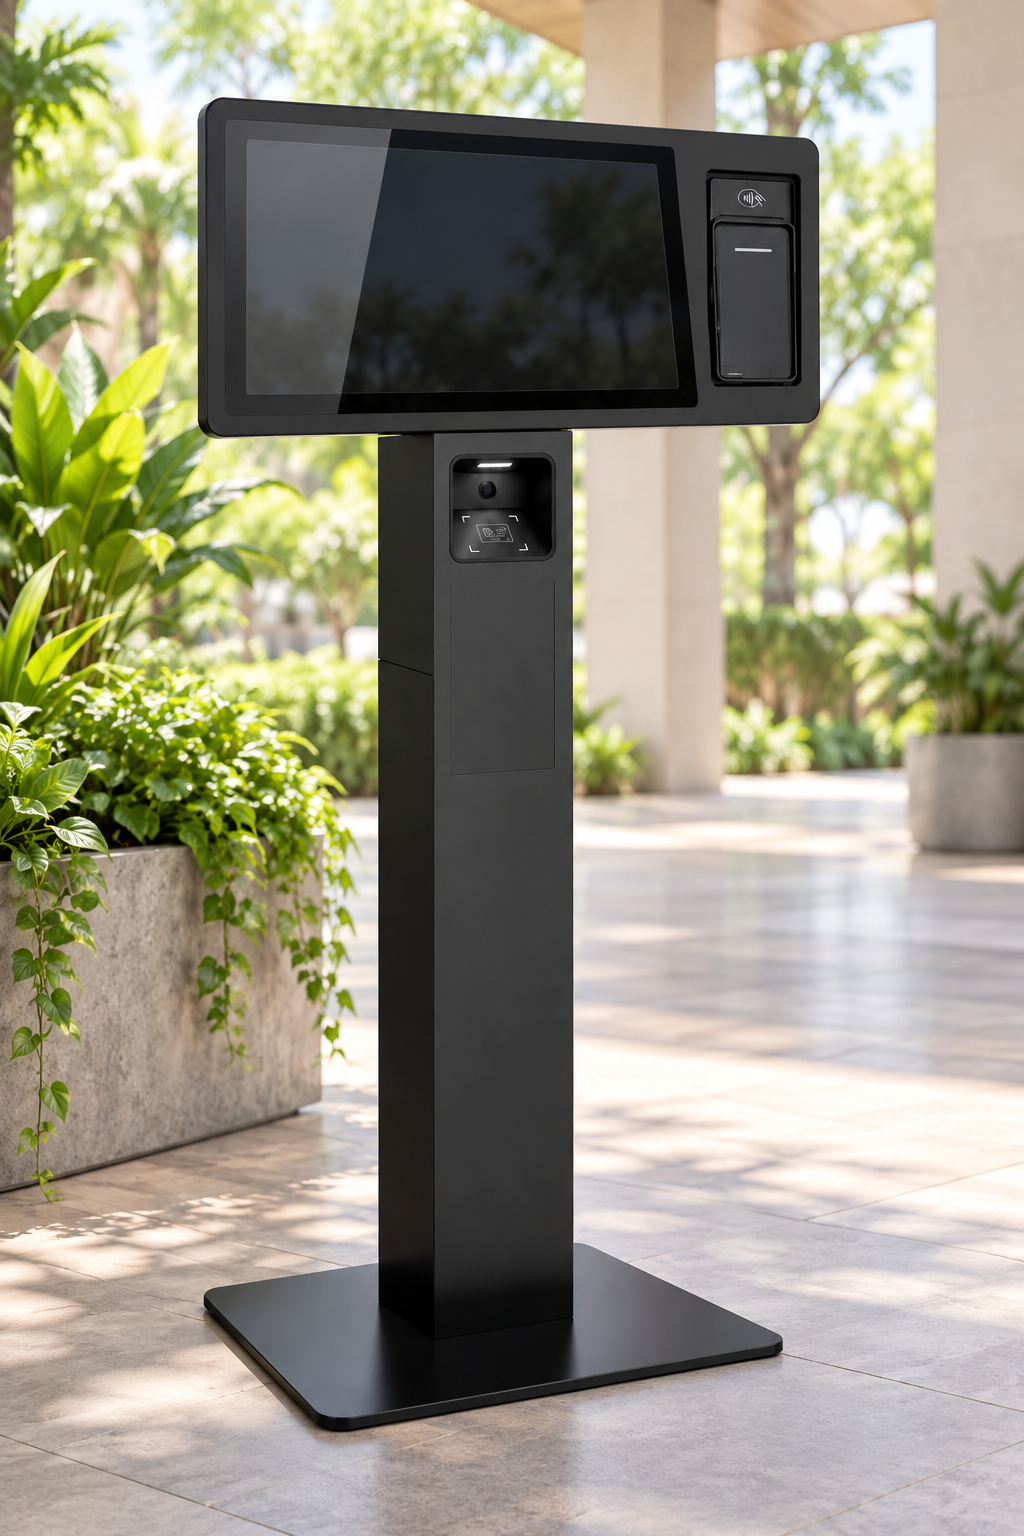
One of the more interesting projects we have worked on recently at Jaeger Technology Group involved the development of a custom interactive kiosk.
At first glance, a kiosk can seem like a relatively simple product. You need a touchscreen, a computer, a reader, some wiring, and an enclosure.
In practice, building a kiosk that is durable, serviceable, accessible, professional-looking, and practical to manufacture requires considerably more engineering.
This project brought together mechanical design, electronics integration, accessibility considerations, sheet-metal fabrication, computer hardware, user ergonomics, cable management, component sourcing, and design-for-manufacturing.
It is a good example of the type of product-development work we regularly perform at JaegerTech.
Starting With the Requirements
The first step was defining what the kiosk actually needed to do.
The system needed to support a user-facing touchscreen interface while housing the computer and supporting electronics inside a self-contained enclosure. It also needed provisions for a reader, camera, internal power distribution, and clean cable routing.
Just as importantly, the system needed to be practical for a commercial environment.
That meant thinking beyond whether the electronics would simply fit inside the box.
We had to consider:
- Screen height and viewing angle
- Accessibility and reach
- Stability
- Overall footprint
- Reader placement
- Camera position
- Internal component access
- Power-button access
- Cooling
- Cable routing
- Future maintenance
- Manufacturing cost
- Ease of assembly
Each of these decisions affects several others, so the project quickly became a systems-engineering problem rather than simply an enclosure-design exercise.
Designing Around the User
One of the most important considerations was the physical relationship between the kiosk and the person using it.
The display needed to be positioned at a height and angle that would be comfortable for a wide range of users while also taking accessibility into account.
We worked around a compact touchscreen display while also considering larger display options for future versions.
The design needed to accommodate standing users while avoiding excessive forward reach.
We also looked carefully at how the reader should be positioned.
Several options were evaluated, including:
- Mounting the reader on the upper surface of the base
- Integrating it into the display bezel
- Mounting it to the side of the monitor assembly
The side-mounted arrangement became especially attractive because it kept the reader visible and accessible without cluttering the main display area.
These may seem like small details, but they are exactly the kinds of details that determine whether a product feels engineered or improvised.
Building the Structure
The kiosk body was developed around a fabricated metal enclosure.
Instead of treating the housing as a simple cosmetic shell, we designed it as part of the structural system.
The enclosure needed to:
- Support the display
- Protect the electronics
- Resist tipping and flexing
- Provide internal mounting surfaces
- Allow access for servicing
- Hide wiring
- Present a clean exterior appearance
We worked through several enclosure concepts before refining the design into a form suitable for sheet-metal fabrication and powder coating.
A channel-style structure was considered because it allowed us to create a strong vertical frame while maintaining internal space for electronics and wiring.
The finished enclosure concept was intended to use a durable powder-coated finish suitable for repeated daily use.
Integrating the Computer
Rather than placing a conventional desktop computer inside the unit, the system was designed around a compact mini-PC.
That approach offered several advantages.
A mini-PC takes up less space, produces less heat, requires less mounting hardware, and can be replaced more easily if necessary.
The computer configuration included:
- Solid-state storage
- Wireless networking
- Active cooling
- Digital video output
- USB connectivity for peripherals
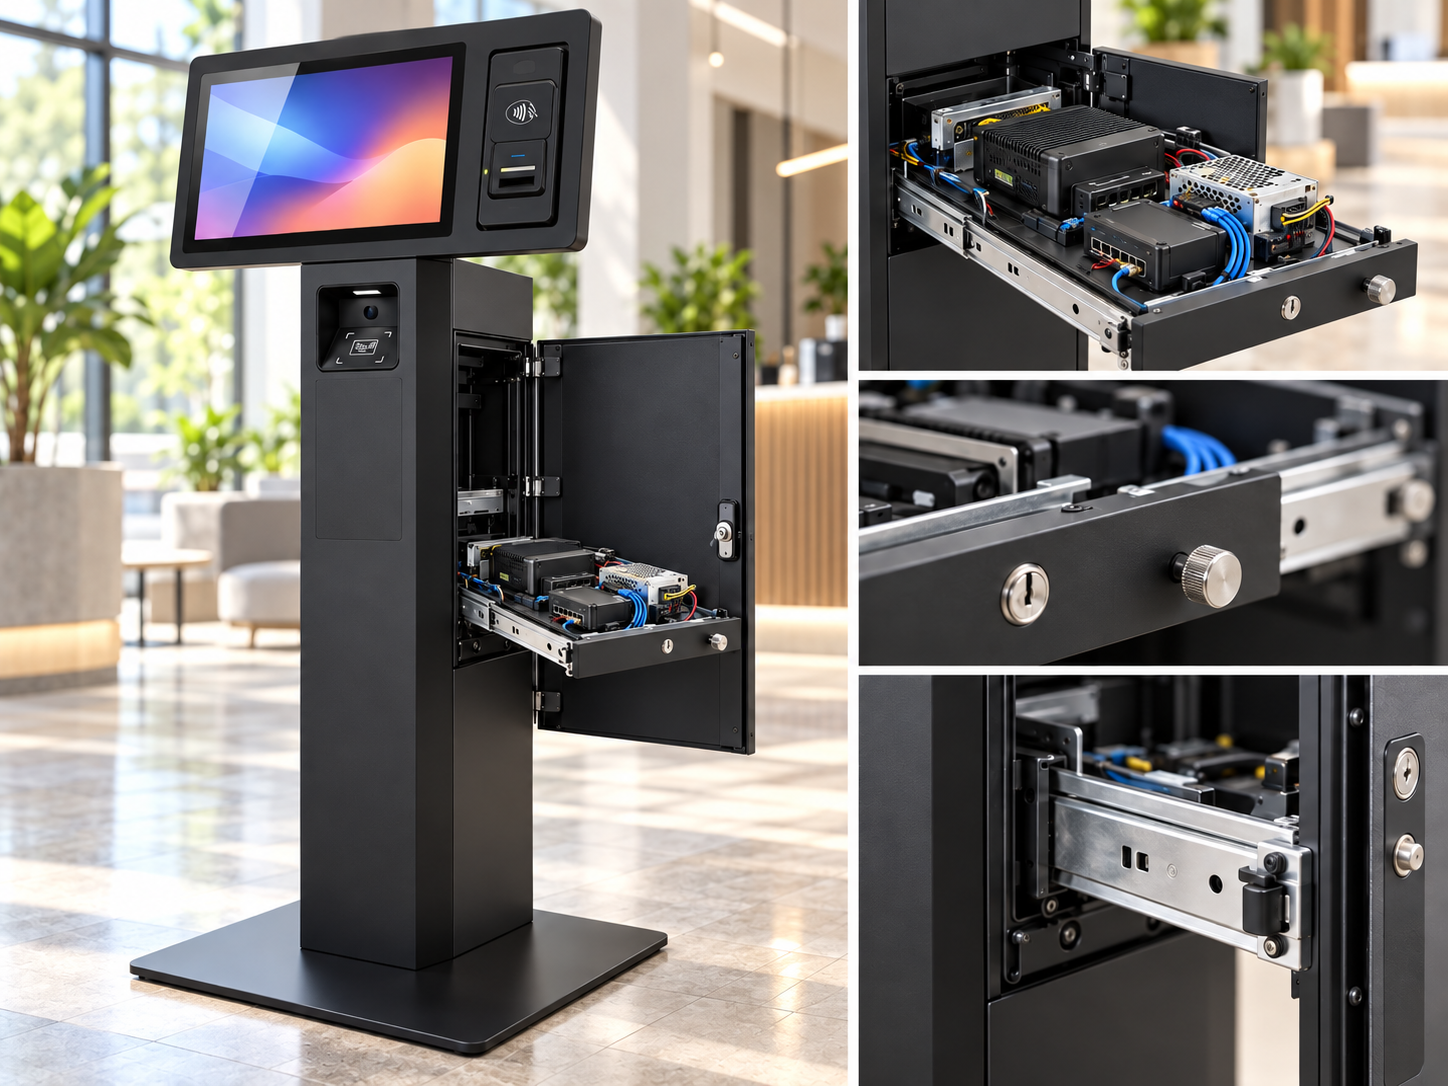
An internal shelf or mounting platform was designed to support the computer inside the kiosk.
One detail we considered carefully was power-button access.
In a commercial kiosk, you do not necessarily want the user casually reaching the computer’s power button, but technicians still need a way to access it when required.
We therefore looked at providing a small external access opening so the computer could be powered or reset with a tool if necessary.
We also considered configuring the system so the computer could automatically power on when AC power was restored.
That type of feature can significantly simplify deployment.
Internal Power Distribution
Power architecture was another important part of the design.
The kiosk needed a single, clean external power connection rather than multiple cords running out of the enclosure.
Internally, power could then be distributed to:
- The computer
- Touchscreen display
- Camera
- Reader
- Additional accessories
We evaluated using a rear AC inlet feeding an internal distribution point.
This makes the finished kiosk much cleaner and easier to install.
An optional master power switch was also considered.
Cable routing was incorporated into the enclosure design rather than being treated as an afterthought.
The rear structure could function partly as a cable raceway, helping keep USB, video, power, and peripheral wiring contained and protected.
Display and Camera Integration
The touchscreen became one of the primary visual elements of the product, so its mounting arrangement required careful attention.
We considered both fixed and adjustable display configurations.
Adjustability can appear attractive at first, but it adds mechanical complexity, more components, more potential failure points, and additional cost.
For a commercial kiosk that may see repeated daily use, simplicity often has significant value.
A fixed-angle display can be considerably more durable if the viewing angle is chosen correctly.
A camera was also incorporated into the upper display area.
Rather than attaching a camera externally, we looked at building a small camera recess directly into the monitor housing.
That keeps the device protected and gives the system a much more integrated appearance.
Prototyping Versus Production
One of the most important parts of the project was distinguishing between the cost of building the first kiosk and the cost of building multiple units.
The first unit carries much of the engineering burden.
That includes:
- Mechanical design
- Drawings
- Component selection
- Prototype development
- Fit checks
- Fabrication setup
- Assembly planning
- Revision work
Once the design is established, those costs can be distributed across multiple units.
For this project, we developed pricing scenarios for both a single prototype and a small production run.
At higher quantities, the engineering cost can be spread across the build, while equipment and fabrication costs can also be reduced through quantity purchasing.
Designing for Lower Production Cost
A prototype should prove the design.
A production product needs to prove the economics.
Once we had the initial kiosk concept defined, we began evaluating where future cost reductions could come from.
Some of the largest opportunities included:
- Higher-volume sheet-metal fabrication
- Consolidating components
- Reducing assembly time
- Simplifying brackets
- Standardizing fasteners
- Purchasing displays in larger quantities
- Purchasing mini-PCs in volume
- Sourcing selected components internationally
This is an important part of product development that is sometimes overlooked.
The cheapest way to manufacture the first prototype is rarely the cheapest way to manufacture the hundredth unit.
Serviceability Matters
A kiosk operating in the field will eventually need service.
That may involve replacing:
- A computer
- A display
- A power supply
- A camera
- A reader
- A cable
If servicing the system requires completely disassembling the enclosure, the product becomes expensive to maintain.
We therefore considered serviceability during the design process.
Internal components were positioned so that they could be accessed with normal tools, while the exterior remained clean and secure.
This balance between accessibility and protection is common in commercial product design.
Why Projects Like This Are Interesting to Us
This project is a good representation of how Jaeger Technology Group approaches engineering problems.
We do not look at a project purely as a CAD exercise or purely as a fabrication job.
A successful product requires all of the pieces to work together.
Mechanical design affects electronics.
Electronics affect thermal management.
Thermal management affects enclosure geometry.
Enclosure geometry affects fabrication cost.
Fabrication affects assembly.
Assembly affects serviceability.
Serviceability affects the customer’s long-term cost.
The job is to understand those relationships early enough that they can be designed into the product rather than fixed later.
More Than 3D Printing
Jaeger Technology Group is well known for industrial 3D printing, but projects like this illustrate the broader work we perform.
Our capabilities include:
- Mechanical design
- Prototype development
- Product engineering
- Electronics integration
- Additive manufacturing
- Large-format 3D printing
- Sheet-metal design
- Custom machinery
- Low-volume production
- Design-for-manufacturing
- Vendor sourcing
- Production cost reduction
Sometimes 3D printing is at the center of a project.
Other times it is simply one tool among many.
The objective is always the same: take an idea, solve the engineering problems around it, and turn it into something that can actually be built.
From One Unit to Many
One of the biggest transitions in product development happens when a project moves from:
“Can we build one?”
to:
“How do we build fifty?”
Those are very different questions.
The first is primarily an engineering problem.
The second adds manufacturing, sourcing, logistics, assembly, service, quality control, and cost management.
Our goal with projects like this is to consider both questions from the beginning.
That way, the prototype is not simply a demonstration piece.
It becomes the foundation for a product that can realistically move toward production.
For us, that is where product development becomes especially interesting.
Turning a concept into a functional prototype is satisfying.
Turning that prototype into something repeatable, manufacturable, and commercially viable is the real objective.
About the Author: jaegertechgroup.com

STAY IN THE LOOP
Subscribe to our free newsletter.
Leave A Comment
Beyond ESP32 and Raspberry Pi: Designing Electronics for Real Products Development boards are one of the best tools available for product development.
From MVP to Market: How Consumer Electronics Become Real Products A working MVP is an important milestone. It proves that the idea
Designing Products for Serviceability, Maintenance, and Field Repair A product can work perfectly on the day it is delivered and still be
When a Customer Has an Idea but No CAD: How Product Development Actually Starts A surprising number of product-development projects do not